The Camera of Project Mana
Camera
For an open-world game like Project Mana, the camera has a huge support role to play. The camera needs to provide clarity for all of the environmental actions in the game, reflect player behavior, and it needs to enhance the mood of the world and actions players take. This was a lot of responsibility for one object, so the camera had to be carefully constructed to both provide the intended experience and be adaptable as the scope of the project increased.Part of my Intended player experience is volition. The player should always feel in control of their actions, and the camera needed to reflect this. So, I had to find ways to balance giving the player total camera control while allowing the camera to react naturally with the environment. So, I would apply multiple camera effects to react naturally to the game, but I would make sure to always prioritize the player input. This ensured the player's control experience was always a top priority.
The Camera Manager
Ultimately, the camera has to handle a lot of different kinds of behavior. The camera had to balance direct input from the player, react naturally to the environment, update according to trigger volumes, focus on new actors, and change direction based on player actions. Initially, I put all of this code inside of a component actor tied to the player. However, this quickly became incredibly convoluted and my code organization was like spaghetti. It was unable to adapt with the project as it grew, so I needed to find a new solution.Fortunately, a solution came in the place of the Camera Manager. Camera Managers are a component that can be attached to an Unreal Controller that can have special modifiers applied. Modifiers are simply individual pieces of behavior that can be applied to the camera simultaneously. For example, automatically turning the camera in the direction the player moved. So, I programmed many Camera Modifiers and applied them to my camera manager so that the camera could simultaneously react to the environment and player input.Modifiers are simply added to the camera manager as a list. So, these modifiers can be dynamically added and removed as needed to ensure that the camera experience is always smooth. For instance, my line of sight modifier works great in outdoor spaces, but in interior spaces it feels like drift. Fortunately, I could control the list of camera modifiers so that I could remove any specific modifier at runtime whenever the need arose.I also needed some modifiers to take priority over others. For instance, my modifier that slowly shifted towards hook actors had a lower priority than the one that matched the camera to fit the wall run. I designed my modifiers so that they could be ordered inside of the Camera Manager class by priority. The ones placed last on the list of modifiers were read last, so their effects could overwrite other modifiers if I needed them to. This is key for creating clarity in gameplay. Playtesting showed me which aspects were the most important to present first, and I reflected the list order to adapt to gameplay needs. This allowed me to control the camera priorities fully and adapt to player needs.However, I needed to make sure that the player always felt in control of the camera with all of the modifiers in place. So, I designed a parent modifier class that grabbed the latest camera input from the player and disabled the current effect for an adjustable amount of time. This way, player input always takes the highest priority.
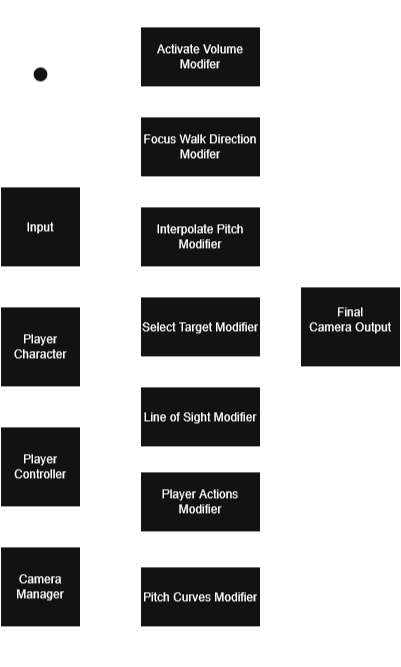
Flowchart depicting the operational flow of the camera.
The Camera Modifiers
Line Of Sight Modifier
I wanted my camera to provide a smooth player experience, so it had to react naturally with the environment. If the camera clipped and collided with every mesh, the game would feel noticeably less fluid. So, I added a modifier that maintained line of sight with the player at all times. Think of this like whiskers that we place around the camera. Whenever one of the whiskers of the camera collides with an object. The camera slowly swings a bit away from that object. This way, the line of sight towards the player is maintained. This naturally keeps the camera away from large obtrusive objects and keeps the focus on the player. It also helps prevent clipping the camera into meshes. While the camera is rotating away from a wall, player input will always override the modification.
If the camera is pushed to a wall, it will naturally rotate away. I only input the camera towards the wall. The camera naturally rotates away. Player Input always overrides.
Camera Focus Walk Direction Modifier
One of my goals for the camera was to reduce unneeded player input. After all, player's should be focused on playing the game and not wrestling with the camera controls. One of the main ways I do that is through the Focus Walk Direction Modifier. It gets the direction the player is moving in and rotates the yaw to match that direction. This keeps the focus on where the player is moving towards so that they can freely move in any direction without thinking about the camera controls.
The camera focuses on where the player is walking automatically. During this recording, I put in no camera input.
Pitch Curves Modifier
I wanted to be able to change two factors of the camera as the pitch of the camera changed: spring arm length and FOV.As the camera goes above or below the player, I change the length to be shorter. When the camera is low, this prevents the camera from clipping and colliding with the floor. When the camera is high, this keeps the focus on the player and ensures they don’t get lost in the terrain. I made this length directly adjustable in-engine with a 2D Curve. This gave me a lot of control as a designer to directly set how far the camera should be from the player at every pitch angle.As the pitch decreases, I also add FOV to the camera. As the player looks up they can take in more of the sky and all of the floating islands of the level. This helped provide one of my key design goals of inspiring wonder into the player. I also mapped the FOV value to a curve so that I had the most control as a designer.
The length of the camera arm and the FOV change naturally with the pitch of the camera.
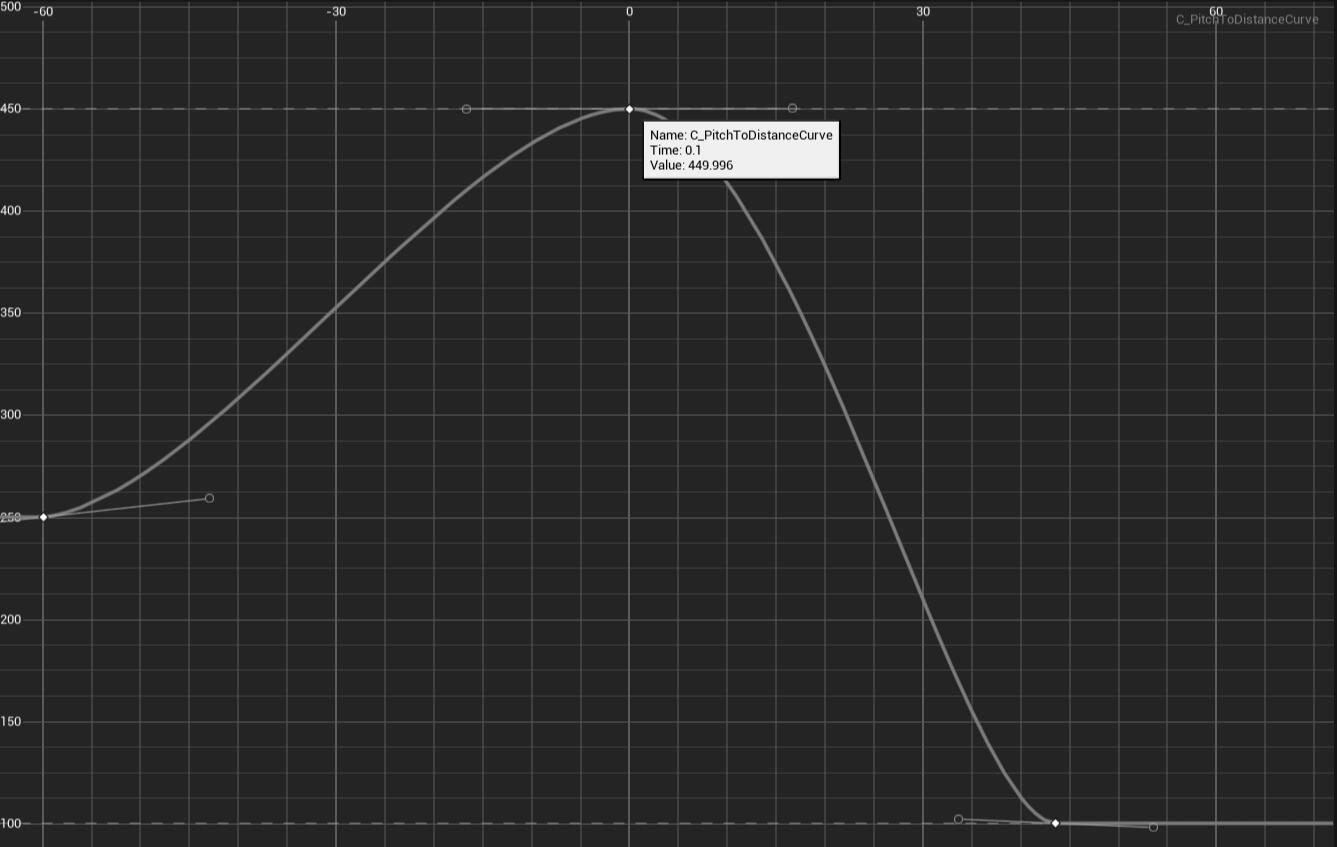
The curve used to control the length of the camera.
Camera Volume Modifier
The camera volume modifier simply adjusts the camera based on when the player enters and exits a trigger zone. The modifier allows the designer to control the field of view, spring arm length, multiple depth of field effects and transition time to apply all of the effects. I use the camera modifier very early on in the level. In one of the first vistas in Project Mana’s open world, I add a modifier volume that slowly extends the spring arm length and increases the field of view so that the player can take in the environment. This adds to the intended experience by pushing that sense of wonder onto the player. This could easily be pushed in the opposite direction to create a more claustrophobic or intimate moment with the player character. This camera modifier is all about putting power into the hands of designers.
The length of the camera arm and the FOV change naturally with the pitch of the camera.
Interpolate Pitch Modifier
Thanks to the hook shot mechanics of the game, the camera can often end up looking down towards the floor. This puts the player focus in the wrong direction. I want them to absorb their environment and continue to search ahead for their future goals. To maintain the intended experience, if the camera receives no input for a few seconds, the camera slowly rotates towards zero pitch. This keeps the player looking forward, and it lets them focus on their immediate environment. However, this modification never interferes with actual player input. If the player chooses to look up or down through the input of the camera, then this modification gets disabled. This way, the player still has total control of the camera as they explore the open-world.
After the hook action, the camera pitch naturally interpolates to keep the player looking forward.
Camera Focus New Actor Modifier
There are two modes for the new actor modifier. If the player presses input to lock on to a target, then the camera will snap to focus on the rotation from the player to the target. This keeps the player looking in the direction they want to and it keeps the camera much more steady during combat. This effect overrides every other effect because look-at rotation needs to be maintained at all times since the player has to actively input this one. This keeps the player in control as player input always takes priority.The other mode is for non-combat moments. During this time, the camera will slowly rotate towards any active hook target. These are one of the main ways that the player interacts with the game, and they can be just outside of the screen but still interactable. If the player hasn’t made any input, then the camera will slowly shift to put focus on this target. This ensures that the player always knows what they can interact with. This also helps in cases where the player needs to look up when the hook target is just off screen. It prevents the player from being stuck and it can provide a short-term goal for the player to continue exploring.
This modifer can either place the focus of the camera on a new target selected by the player or it can slowly focus on targets it finds throughout the world.
Player Actions Modifier
The camera also reacts to any current action the player is taking. If they are wall-running, zipping to a hook, launching up, swinging, dodge rolling, blocking (without a focus target), or air-attacking then the camera matches that action. I took the same approach to each effect. First, I show the player where they are going. Then, I enhance the motion of the action.For wall running, I rotate the camera to be up close and behind the player. I shift the camera to the side of the player so that the camera is always along the left or right third of the screen. I then rotate the yaw of the camera a bit away from the wall they are running along. This keeps the player focused on the direction they are running, and it also gives them a sense of where they would land if they jump off the wall. To help show where they land, I also pitch the camera a little down. These effects all added to the clarity of the wall run by placing focus on where the player is headed and where they could go.To enhance the motion of the wall run, I then roll the camera a little with the wall direction to match the angle that the player character is running along. This puts the player in their character’s shoes and enhances the vertigo of the run a little bit. I move the camera very close behind the player to give a sense of the world from their perspective. These systems combine to create a cinematic wall run that doesn't get in the way of clarity.For zipping to a hook, I simply rotate the camera towards the hook target. I understood that this was a very quick motion, so I had to carefully balance how fast the camera rotates to the target while maintaining that sense of speed. One trick I used was to match the camera to the player character’s rotation rather than the direction to the hook. It takes some time for the player to rotate all the way towards the hook, so this takes away a lot of the initial jolt of the camera motion. However, I still keep the interpolation speed quick to enhance the quick motion of my zip-to-point ability.For launching up, I simply push the camera closer to the player and I rotate it up as the player is launching. This shows the player immediately where they are moving to and it enhances the extreme vertical movement of the launch-up ability.For swinging, I had to sell the motion of the swing itself without getting the player sick. So I set the interpolation speed low, and I match the forward vector of the player character. That forward vector has no pitch movement, so it keeps the focus purely on the yaw of the player. I tried adding motion with the pitch, but it was overbearing, nauseating, and distracting from the core swinging experience. Sometimes camera design is knowing when to remove unnecessary movement. The core of the swing had to show where the player was going, so I made sure that the focus was always on the yaw direction of the swing.For dodge rolling and blocking without a target, I follow the forward vector of the player and pitch it down slightly. This keeps the player looking at the direction of their rolling motion or where they are currently facing. It also keeps their focus on what’s immediately around them by keeping the pitch focused on the ground around them.For air attacks, I moved the camera towards the player significantly and pitched it down. This way, when the player unleashes the attack, they have a very clear view if they hit an enemy or not. It also preserves the sudden downward motion of the air attack and lets the player feel the plunge they take.
This corridor shows how the wall run camera works from multiple different directions.
The camera angles up as the player is launching up to show the player where they are headed to.
The camera angles up as the player is launching up to show the player where they are headed to.
During an air attack, the camera angles down to show the range of the attack.